Measuring Distance and Climb ↑
Course distance (in kilometers) is the total straight-line distance measured between controls on the map. Obviously, the actual distance depends on competitors' route choices.
Course climb (in meters) is measured as the total ascent along the optimal route between controls — that is, the number of uphill contours (don't count descents). This is not along the straight-line, nor the minimal number of contours, between two controls, but rather the logical route choice, including lost elevation when contouring through large reentrants. Don't underestimate the climb figures — be as accurate as possible; the participants will thank you for it.
Total climb should be up to 4 percent of the distance. You can increase the climb to 7 percent in some Bay Area parks (you often don't have much choice). If you want to make a course tougher, increase its technical difficulty, not the climb. Nobody appreciates extra climb (also known as "gratuitous violence").
The published climb number should be rounded to the nearest 5 meters.
Course Specs ↑
Set the distance so the top runner (known as a 100-point runner) for each course can complete it in the time shown in the following table. The distances shown here are representative. We don't have many 100-point runners in our club, so expect winning times to be longer for some of the courses. Anthony Riley is about a 100-point runner on Blue courses; if he finishes in the time shown in the following table, the course was probably set with the right length and climb.
The specification that takes precedence is in bold. Specifications that deviate from OUSA guidelines are in italics. These are official BAOC guidelines as adopted at September and December 1998 meetings of the BAOC Board of Directors. "Distance Ratio" refers to the length of the course as compared to the Blue course.
| Course | Difficulty Level (navigation) | Winning Time (minutes) | Approx. Distance (kilometers) | Distance Ratio (percent) |
|---|---|---|---|---|
| White | Beginner | 25–30 | 1.5–3.0 | 20–25 |
| Yellow | Advanced Beginner | 35–40 | 2.0–3.5 | 30–35 |
| Orange | Intermediate | 50–55 | 3.0–5.0 | 40–45 |
| Brown | Advanced | 45–50 | 2.5–4.5 | 34–38 |
| Green | Advanced | 50–55 | 3.5–7.0 | 50–55 |
| Red | Advanced | 60–65 | 5.0–10.0 | 70–75 |
| Blue | Advanced | 75–80 | 7.0–14.0 | 100 |
Course-by-Course Details ↑
White Course ↑
White is designed for beginning orienteers and young people under 12 years old. All controls should be on trails or handrails (fences, streams) that are easy to follow. It is often recommended to place controls at decision points on the course, but there should be only one route choice. Climb should be kept to a minimum.
Avoid the temptation to set a challenging White course. The White course can never be too easy. Remember, these are first-time or young orienteers who are just learning to read the map and associate it with their surroundings.
The distance should be 1.5 to 3 kilometers, with shorter distances in our steeper or more rugged parks.
Yellow Course ↑
Yellow is designed for advanced beginners who need to follow handrails (preferably not trails) to the area of a control, but are ready to leave the handrail near the control. Controls should be on or within sight of handrails. Controls do not need to be placed near decision points. Leg lengths should not vary much. The fewer trails you use as handrails, the better-prepared Yellow orienteers will be for intermediate (Orange) courses.
The distance should be 2 to 3.5 kilometers, with shorter distances in our steeper or more rugged parks.
Orange Course ↑
Orange is designed for intermediate orienteers who are ready to begin going cross-country. There should be two route choices to each control: One route should be a direct, cross-country route, and the other should be a longer, handrail route. Normally, the cross-country route should give the better time for the more-experienced intermediate orienteers.
Leg lengths should vary. Orienteers should be encouraged to use compasses and simple contouring to cut corners. Cross-country routes should have large features that can serve as attack points.
The distance should be 3 to 5 kilometers, with shorter distances in our steeper or more rugged parks.
Brown, Green, Red, and Blue Courses ↑
The advanced courses are designed for orienteers able to make full use of their maps, compasses, and the terrain. The navigational difficulty is exactly the same for all four courses; the difference lies in the total distance and climb. The Brown course should have a minimum of physical punishment; the Blue course should be the most physical.
Note: See below for the specific advice on reducing the physical difficulty of Brown courses.
These courses should be completely cross-country (minimal use of trails), and should encourage orienteers to interpret complex contour and feature details. Legs should vary in length. Control sites should be on point features far from obvious relocation points. Errors can result in large time losses for the longer courses.
Silver Course ↑
Advice to Course Setters: Reducing the Physical Difficulty of Brown Courses
The Bay Area Orienteering Club (BAOC) has a policy to reduce the physical difficulty of our local Brown courses when they are set in rugged terrain — that is, in most BAOC terrain, except for our flatter urban parks. This policy is not meant to be an extra burden for course setters (we'd like course setting to remain simple and appealing), so we suggest below some easy ways to achieve the policy, any of which would be welcome.
Option: Reduce the stats on the Brown course ↑
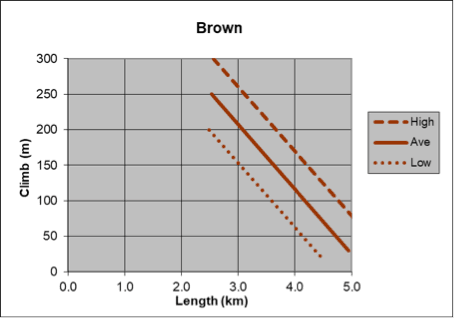
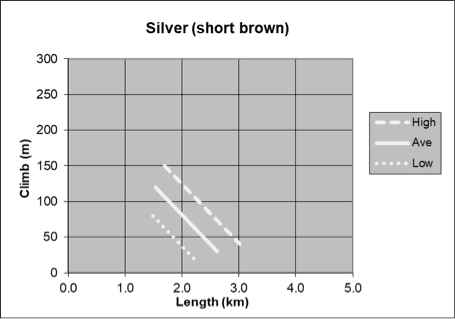
Set a Brown course with 1/2 to 2/3 of the usual climb and distance. Figure 1 below shows typical and reduced Brown statistics, (a roughly ~1/2 size reduction is shown). The graphs illustrate statistics for reasonably open terrain such as Joe Grant or Pacheco Pass; further reductions would be necessary with fight, undergrowth, or poor footing on the courses. The graphs show a distance-climb tradeoff. While it's usually better to avoid climb, the figures show how higher climb, sometimes unavoidable, can be compensated for with reduced distance. The error bands around the lines recognize that course setters do not always have the time and resources to calibrate courses precisely.
If your strategy is to simply reduce the Brown course, we recommend calling it a "Silver" course. That way orienteers expecting a full Brown course can decide if they would prefer to move to the Green course. While having both a Brown and a Silver course is preferable, if only one course is offered, a reduced Silver is deemed preferable to having only a difficult Brown course for elderly orienteers.
Option: Split the Brown course into a Brown and a Silver course ↑
This adds an extra course to your offerings. The club's policy does not require it, but it can sometimes be achieved easily by reusing controls between the Brown and Silver courses. With typical participation numbers, there will not be significant congestion on the reused portions of the courses.
Option: Provide a mid-course option to reduce the Brown course ↑
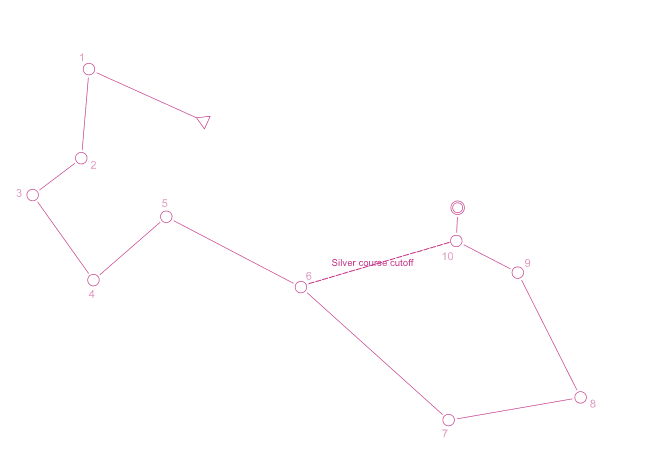
Print the Brown course maps with a cut-across, "Silver option", as illustrated in Figure 2. Orienteers can start on the full Brown course, and then decide partway through to participate on the reduced Silver course — or start on Silver and change to the full Brown course. (If they decide to change from the course they indicated before starting, they can report the new course afterwards at E-punch download.) The club has tested this option and it is popular; however, it will depend on the terrain if such a design is possible and desirable; the cut-across needs to be available far enough into the course that orienteers can form an opinion of which course they prefer, and it must be easy enough to be appropriate for the shorter course. Course designers usually have a variety of trade-offs and constraints to consider, and should not feel compelled to provide such a well-structured choice.
Option: Set all the courses shorter, providing a "Middle-distance" event ↑
This can be an excellent way to add variety to local BAOC events while shortening the Brown course. However, Middle-distance events, with their emphasis on shorter technical legs, may not exploit as well the opportunity for interesting route-choice legs afforded by the rugged BAOC terrain. Use this approach judiciously.
General Advice on Course Design for physically easier Brown and Silver courses ↑
Several general course-design principles can be applied to reduce the physical difficulty of all courses. We review a few here.
Set the Start higher than the Finish
This will reduce the overall statistics, but it makes sense only when the extra altitude benefit can be spread well over multiple course legs (or the walk to the Start gives access to flatter terrain). However, long walks to/from the Start/Finish, to gain an altitude benefit, can add time and difficulty to event logistics. It's a tradeoff for the course designer to consider.
Avoid excessively steep areas that cannot be easily ascended or descended (e.g., needing use of hands)
This involves avoiding spots on the map with high gradients. The national guidelines suggest an overall course gradient of 4% (climb/distance). In the BAOC terrain, it can often be difficult to get the overall gradient below 6% (but this can be compensated for by reduced overall distance, as shown above in Figure 1). However, here we are referring to local patches of gradient, which should be less than 40%, or they will likely be difficult to cross. The local gradient can be read from the map (using a ruler and compensating for map scale), but often needs to be reviewed in the field. It is particularly important to avoid placing controls in steep patches — in some cases, these may be too small to show on the map. It is also important to avoid steep gradients on the routes that will be chosen by Brown-course and Silver-course orienteers. Steep gradients are normal on BAOC maps — the existence of steep gradients nearby can be an effective way of creating interesting route choices — it just needs to be easy to avoid these steep gradients on the routes chosen.
Avoid "gratuitous" climb
We use "gratuitous" to describe climb that does not benefit the course design. An example of gratuitous climb would be a climb of 40 meters to reach a control, followed by a descent of 40 meters on the next leg. However, if a climb of 40 meters is followed by 2–3 controls in interesting terrain, then such a climb can be worthwhile. The point is not to avoid climb entirely, which might entail uninteresting legs, but rather to make sure climb brings value (e.g., good route choice or technical detail) to the overall design.
Avoid rugged stream and gully crossings
Due to lack of space on maps, it is often difficult to represent the degree of cross-ability of linear (2D) features such as streams, gullies, ditches, and fences. Completely uncrossable features require using uncrossable-cliff or uncrossable-fence symbols, or marking areas out of bounds. However, in BAOC terrain there are many places where linear features would be crossable for younger orienteers (e.g., on Red and Blue courses), but very difficult for older orienteers — and the degree of difficulty cannot easily be judged from the map. For the Brown and Silver courses, fieldwork should include looking at these linear features, and, if necessary, adjusting the course design. If good crossings of a linear feature are easy to find by reading nearby contours on the map, or viewing the linear feature on approach (e.g., within 10–20 meters), then no special care is necessary. Otherwise, we recommend adding a control, or a crossing symbol, or routing these courses around such problematic linear features. Controls placed in streams and gullies should be where the linear features are easy to cross.
Resources ↑
- Course Setter's Workshop by Evan Custer (PDF version)